Back to BisDent Globe Articles
Bisco's eCEMENT in Everyday Porcelain Cementation
Fred Peck, DDS, AAACD
Private practitioner, Cincinnati, Ohio
Dentistry is undergoing major innovations in the arena of dental ceramics and bonding cements. New ceramic materials are continually being introduced to the dental profession. These materials need reliable adhesion cements such as eCEMENT from BISCO.
This new cement comes in both light-cured and dual-cured formulations. In my office, I have been using the light-cured eCEMENT under porcelain veneers, where I can achieve a complete cure. The single phase eCEMENT can also be used with lithium disilicate and other glass ceramics (such as feldspathic & leucite reinforced). The dual cure is ideal for inlays, onlays, crowns and bridges. My ceramic material of choice in the anterior is often IPS e.max®*, to obtain the best esthetic results and strength. eCEMENT is the ideal adhesive cement for my IPS e.max® restorations.
A conservative porcelain onlay preparation, where there is no shoulder, restoring the occlusal ⅓ - ½ of the tooth, is an ideal candidate for dual cure cementation. The case that is demonstrated on the right is tooth #30 (Figure 1). The patient’s chief complaint was a chip on the existing restoration with occasional sensitivity upon chewing. Closer examination revealed a crack through the distal marginal ridge. The existing composite was removed and a crack was evident extending from the distal ⅔ towards the mesial along the pulpal floor, with decay present on the mesial interproximal. A porcelain onlay was the best restorative option. Reduction of the occlusal surface was done leaving a band of enamel completely around the tooth. A composite base was placed to idealize the prep and eliminate undercuts (Figure 2). The preparation was scanned with a Cerec OmniCam and milled in-office with an IPS e.max® CAD block. I stained, glazed, adjusted and prepared the restoration for final cementation.
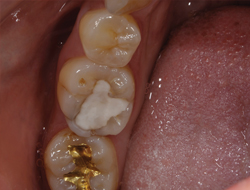
Figure 1: Patient complained of chewing sensitivity on
tooth No. 30 and a chip in the existing restoration.
The existing composite was removed, and a crack was evident,
extending from the distal two thirds toward the mesial
along the pulpal floor, with decay on the mesial interproximal.
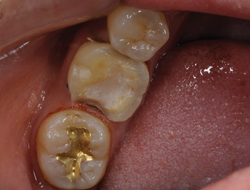
Figure 2: Reduction of the occlusal surface was provided,
leaving a band of enamel completely around the tooth.
A composite base was placed to idealize the preparation
and eliminate undercuts for a porcelain onlay.
The tooth was isolated and micro-etched with 27 micron aluminum oxide. The enamel was then etched with BISCO’s SELECT HV® ETCH gel, which has an antimicrobial agent** benzalkonium chloride. The etchant was rinsed with water and blotted dry. BISCO’s ALL-BOND UNIVERSAL® adhesive was applied with a microbrush and scrubbed into the dentin in two coats. The solvent in the bonding agent was evaporated with an A-Dec Air Dryer for 10-15 seconds, until no bonding agent moved. The onlay was etched with hydrofluoric acid and silinated with Porcelain Primer. Adhesive was placed in the onlay followed by application of dual cure eCEMENT. The onlay was seated and allowed to self cure for 20 - 30 seconds. The margins were spot cured for 1 second and the excess cement was removed with a scaler and floss. Final curing was done for 40 seconds on all sides. Occlusion was verified and the patient left happy with their new restoration (Figure 3).
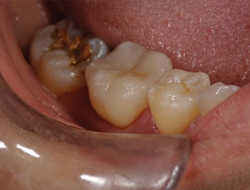
Figure 3: Final restoration was milled in-office with
an IPS e.max® CAD block, followed by cementation
with BISCO’s dual cure eCEMENT system.
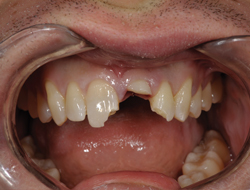
Figure 4: Patient with fractured No. 9 at the gingiva,
and fractured tooth Nos. 8 and 10. Diagnostic casts for a
wax-up were made, followed by extraction and
placement of an immediate implant by the oral surgeon.
The second example demonstrates eCEMENT being used for anterior restorations (Figure 4). The patient was hit by a car, fractured #9 at the gingiva, and fractured #8 and #10. Diagnostic casts for a wax up were made and he was referred to the oral surgeon for extraction and placement of an immediate implant. He returned afterwards for an immediate temporary crown and provisional bonding. After adequate healing, IPS e.max® porcelain veneers were placed on #8 and #10. An IPS e.max® crown was placed over the implant abutment on #9. The veneers were seated with translucent shade eCEMENT light cure cement and #9 was seated with eCEMENT dual cure (Figures 5-6). The teeth and ceramic were treated in a similar manner as the patient discussed above.
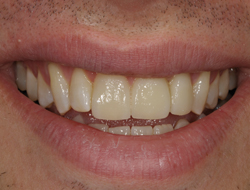
Figure 5: He returned for an immediate
temporary crown and provisional bonding.
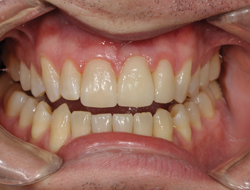
Figure 6: IPS e.max® porcelain veneers were seated on
tooth Nos. 8 and 10 using the translucent
shade of eCEMENT light cure cement. IPS e.max® crown
was placed over the implant abutment
on No. 9. with eCEMENT dual cure.
I have been using BISCO’s new eCEMENT in both formulations for many months with excellent success. eCEMENT with its strong bond strength is an excellent choice of bonding cement for all types of glass ceramic restorations.
* IPS e.max is a registered trademark of IVOCLAR VIVADENT, Inc. eCEMENT is a trademark of BISCO, Inc. There is no sponsorship, affiliation or connection between BISCO, Inc. and IVOCLAR VIVADENT, Inc.
** Inclusion of BAC has not been shown to correlate with a reduction in secondary decay in patients. In-vivo clinical studies to evaluate the effects of BAC on oral bacteria or caries have not been performed.
Back to BisDent Globe Articles