

Key Takeaways:
- Making a composite restoration look natural requires getting multiple things right simultaneously: shade selection, material choice, layering technique, and polishing. Missing any one of them can create an unnatural look.
- Translucency is the most overlooked dimension of composite esthetics. A restoration can match a tooth's color perfectly and still look fake if it doesn't replicate how that tooth transmits and scatters light.
- Polishing is not the final step, it's the esthetic step. A rough surface scatters light, stains faster, and will never look like natural enamel regardless of how well everything else was executed.
Natural teeth are complex optical structures, not just a single shade of white. Enamel translucency, dentin opacity, fluorescence, refractive index, and surface texture all influence how teeth reflect and transmit light. Composite restorations succeed when restorative materials replicate those optical properties, not just the tooth’s color.
Composite esthetics are unforgiving. Even when most variables are controlled, restorations can still miss the mark with the wrong shade, a chalky appearance, or margins that become immediately noticeable. It's a frustrating and surprisingly common challenge in restorative dentistry.
At BISCO, we've spent 45 years studying what happens at the interface between dental materials and living tooth structure. Adhesion and esthetics aren't talking points for us, they're the foundation of everything we make. Our deep knowledge of chemistry gives us a specific perspective on why esthetic outcomes fall short, and more importantly, what to do about it.
To break it down at the material level, we sat down with Natalie Keehan, Research Scientist at BISCO, who works directly on the composite formulations that clinicians place every day. Here's what she wants you to know.
The Tooth Restoration Is Complete, So Why Does It Look Wrong?
Keehan puts it plainly: "There are a lot of ways for something to look fake, and not a lot of ways for something to look natural, because you're trying to match the tooth around the restoration, and every tooth is optically unique."
Natural teeth reflect, refract, and scatter light differently across the incisal and cervical areas due to variations in enamel thickness, dentin opacity, and refractive index, and they also exhibit natural fluorescence. You're trying to replicate that behavior with a manufactured material whose optical performance is influenced by factors like filler size, which affects light scattering, polishability, and long-term gloss retention. Even small mismatches in these properties can be enough for the eye to pick up a difference. Here's where things typically go wrong.
Culprit #1: Shade Selection Went Sideways
Beyond Shade Matching: Why Translucency Matters
Keehan describes translucency this way: "It's all about how much light passes through a material and is either reflected or scattered." Natural tooth enamel is translucent. Light passes through it, bounces around, and comes back out in a way that gives teeth their characteristic depth and glow. When you fill that enamel with something more opaque, the tooth loses its clear coat. The result looks flat, wrong, and fake.
She uses a memorable analogy: "Think of it like glass. if a colored glass was broken and repaired with something of the same color, that wasn’t glass, the translucency wouldn't look right." Same color, wrong optical behavior, and the eye catches it immediately.
This is why hue alone isn't enough. A composite can match the color of a tooth perfectly and still look artificial if it doesn't match its translucency. That's the dimension most shade guides don't fully capture, and the one that separates restorations that blend from ones that stand out.
Understanding the Dimensions of Tooth Color
Color in dentistry is communicated across three dimensions: hue (the base color, including yellow, grey, or orange undertones), chroma (the intensity or saturation of that color), and value (brightness, from dark to light). Your shade guide addresses all three, and most experienced clinicians are comfortable navigating them.
But shade guides are a starting point, not a guarantee. The process is inherently operator-dependent, influenced by lighting conditions, surrounding teeth, and the hydration state of the tooth at time of selection.
Shade mismatches often come down to timing and operatory conditions, and those conditions directly affect how hue, chroma, and value are perceived. Teeth that are isolated or air-dried tend to appear higher in value and lower in chroma than they do in the natural oral environment, where moisture and saliva restore depth and surface sheen. When shade selection is made under these drier conditions, you're working from a shifted version of the tooth’s true color, so once natural conditions return, the restoration can appear too light.
Best practice: Select shade before isolation, in natural or consistent overhead light, on a fully hydrated tooth.
Culprit #2: The Wrong Material for the Job
Not All Composites Are Created Equal
The material you choose sets the ceiling for what your technique can achieve. A composite with poor polishability or the wrong optical properties will look unnatural no matter how skilled the clinician. That's a material problem, not a technique problem.
At the materials science level, the biggest driver of esthetic outcome is filler technology. As Keehan explains: "You want the surface to be as smooth as possible for polishability. The smaller the particles are, the smoother you can get the surface. The problem with minimal size is that you're also decreasing the strength. You want the right balance between shininess and strength."
When a Single-Shade Composite Isn't Enough
Single-shade composites have real utility. They simplify workflows and reduce inventory, but they don't work in every case. Complex shade situations, significant chroma variation, and anterior restorations with visible enamel all demand layering: a more opaque body shade at depth to mimic dentin, and a more translucent enamel shade at the surface. Without that gradient, you're placing one flat layer of color where a natural tooth has multiple layers of light behavior.
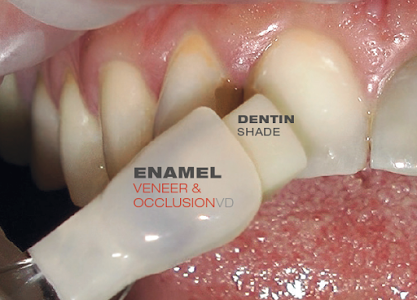
Photo Credit: Edelweiss Dentistry
Culprit #3: Polishing Was Rushed or Skipped
Polishing Isn't the Last Step — It's the Esthetic Step
Ask Keehan what polishing actually does at the material level and she doesn't mince words: "When you polish a composite, you are basically taking sandpaper to the surface and breaking off bits of the composite to rip off the chunks that are sticking out. The goal is to make the surface as smooth, shiny, tooth-like, and natural as possible."
An unpolished composite surface is microscopically rough, and a rough surface doesn't reflect light the way enamel does. It scatters it. The result is that chalky, matte appearance that makes a restoration look like a patch rather than a tooth. It also means the surface has more nooks and crannies for stain to grab onto from day one.
Multi-step polishing is non-negotiable for anterior restorations. The surface texture of a restoration matters as much as the shade.
The Staining That Comes Later
Even a well-polished composite shows more staining over time than natural enamel. As Keehan explains, "Composite will hold onto colors, coffee and so on, more than the tooth." Poor polishing makes this worse by leaving the surface more porous and harder to clean. Over time, differential wear between the composite and surrounding tooth can also create a visible shelf that makes the restoration stand out. Setting patient expectations upfront and reinforcing good home hygiene habits is part of the conversation that often gets skipped.
Culprit #4: Marginal Integrity and the "Dark Halo" Effect
The dark halo is a shadowing effect at the margins of anterior composite restorations, a visible darkness where the restoration meets the tooth. It's an optical problem at the interface between two different materials, and it's most noticeable when the margin isn't sealed properly. Proper adhesive technique is the primary defense. A well-bonded, well-sealed margin minimizes the optical discontinuity and resists the marginal staining that deepens the effect over time.
Culprit #5: Dehydration at Time of Shade Selection
Teeth isolated under rubber dam or air-dried during a procedure appear significantly lighter and brighter than their true color. Select shade against a dehydrated tooth, and your composite will be too light once moisture returns. The fix is straightforward: always select shade before isolation, in consistent lighting, on a fully hydrated tooth.
So How Do You Build a Tooth Restoration That Actually Looks Natural?
Start With the Right Composite
Material selection is the foundation. And here's something Keehan says that's worth sitting with: "When you want your composite to do everything, it's not going to be the maximum of everything all at once. Right now, limitations mean that dentists are going to have to make choices about what is actually most important to them."
For esthetic restorations, you want a composite that follows a full shade system and offers both body shades and enamel shades engineered to work together. That dual-shade architecture solves two problems at once. As Keehan explains: "Half of it is giving you the ability to have the correct translucency at the correct location. The good thing about having two separate shades is if someone is in between shades, you can mix and match the body and enamel to get what you're looking for." That flexibility is what a full shade system actually buys you, not just for complex cases, but for any case where a single shade won't quite get you there.
Layer Like a Tooth, Not Like a Filling
The anatomy of a natural tooth gives you the blueprint. Dentin is deeper, more opaque, and warmer in color. Enamel is at the surface, thinner, more translucent, and cooler. When you replicate that with body and enamel shades, you recreate the optical gradient that makes a tooth look like a tooth instead of a plug. Place your body shade at depth in 1-2mm increments, cure fully, then build toward the surface with your enamel shade. The light behavior changes across the restoration the way it does across a real tooth. That's what blending actually means.
Finish and Polish Like It Matters
A multi-step polishing protocol is the difference between a restoration that looks great and one that almost gets there. Work progressively finer to achieve a surface that reflects light cleanly. For anterior cases, pay attention to surface texture. Replicating the subtle macro and micro texture of natural enamel helps the restoration integrate visually rather than sit on top of the tooth.
Check Your Work Before the Patient Leaves
Let the tooth rehydrate after placement, then evaluate under different lighting if possible, and with the patient's eyes involved. Ask them to look. Their perspective is fresh and unfiltered in a way yours isn't after an hour of focused chairside work. A small adjustment now is always easier than a phone call next week.
Build Tooth Restorations That Look Like Teeth
Making a restoration look natural is harder than making it look fake. That's not a reason to be discouraged. It's a reason to be deliberate about your material, about when and how you select shade, and about how much time you invest at the end with your polishing system.
Material and technique working together is the formula. And when you start with a composite engineered with the right filler technology, the right shade architecture, and the right balance of strength and polishability, you give your technique the best possible foundation to work from.
Frequently Asked Questions
Why does my composite restoration look white and chalky?
This is almost always a combination of material and technique factors. The composite shade may be too opaque for the location, particularly at the incisal edge where enamel shades with higher translucency are typically needed. Surface roughness from insufficient polishing also contributes: a rough surface scatters light rather than reflecting it, creating that chalky, matte appearance. Evaluate both your shade selection process and your polishing protocol.
Can a discolored composite be fixed without replacing it?
Sometimes. Superficial staining at the surface of an inadequately polished restoration can often be addressed by polishing away a thin layer and essentially refreshing the surface. If the discoloration is internal, or if there's marginal breakdown or recurrent decay, replacement is the right call.
Why does the composite look fine at first but change color over time?
Two things are usually happening. First, surface porosity from incomplete polishing allows stains from food and drink to penetrate the restoration gradually. Second, differential wear between the composite and surrounding tooth can create a visible ledge over time. Good polishing at placement and patient education about staining habits both help extend how long the restoration looks its best.
Does the bonding agent affect how the composite looks?
Yes, indirectly but meaningfully. Proper adhesive application drives marginal seal quality, which determines how the margin looks over time. A well-bonded margin resists microleakage and the staining that creates the visible dark lines at the restoration’s edge – the Halo Effect. Bonding technique is part of the esthetic outcome, not separate from it.
Is there a composite that's easier to shade-match for less experienced clinicians?
Layering systems that separate body and enamel shades are often more forgiving than they initially seem. If a body shade is slightly off, a more translucent enamel layer can help soften the discrepancy and create a more natural blend. When patients fall between shades, clinicians can also mix and match to fine-tune the result.
The key is understanding the logic behind the layering approach: body shades provide opacity and chroma at depth, while enamel shades control translucency and surface vitality. Once that relationship clicks, shade selection tends to become much more intuitive.
Want to go deeper on what makes a composite actually polishable? Read our breakdown: From Grit to Gloss: How Filler Size Impacts Dental Composite Polishability